
📚 TABLE OF CONTENTS
Facebook Marketplace has grown to be one of the most popular platforms for buying and selling items locally. Launched in 2016, it provides a convenient and accessible space for users to list items for sale, browse local deals, and make purchases—all within the familiar ecosystem of Facebook. Whether you're looking to declutter, start a small business, or find great local deals, Facebook Marketplace offers an easy-to-use platform that reaches a broad audience.
📖 This guide will walk you through how to post items on Facebook Marketplace and optimize your listings to ensure quick and successful sales.
Why Use Facebook Marketplace?
Before diving into the process of posting on Facebook Marketplace, it’s helpful to understand why this platform has become so popular.
- Large Audience: Facebook has over 2.8 billion active users worldwide. The Marketplace taps into this vast audience, increasing your chances of finding a buyer for your items.
- Local Focus: Marketplace is location-based, meaning that people in your area can easily find your listings. This makes transactions, such as meeting up to exchange items, more convenient and secure.
- Ease of Use: Since Facebook Marketplace is integrated into the main Facebook app, posting items is quick and straightforward. Users can easily access it from their desktop or mobile device.
- Cost-Effective: Unlike some other online platforms, Facebook Marketplace doesn’t charge a fee to list items for sale, making it an affordable option for both individuals and small businesses.
Now that you know why Facebook Marketplace is a great option for buying and selling, let’s walk through the steps to post your first item.
📢 FYI: If you want to download Facebook videos instantly, you can use our tool. It's free to use.
How to Access Facebook Marketplace
Before you can post an item, you need to access Facebook Marketplace. This can be done from both your desktop and the Facebook mobile app.
On Desktop
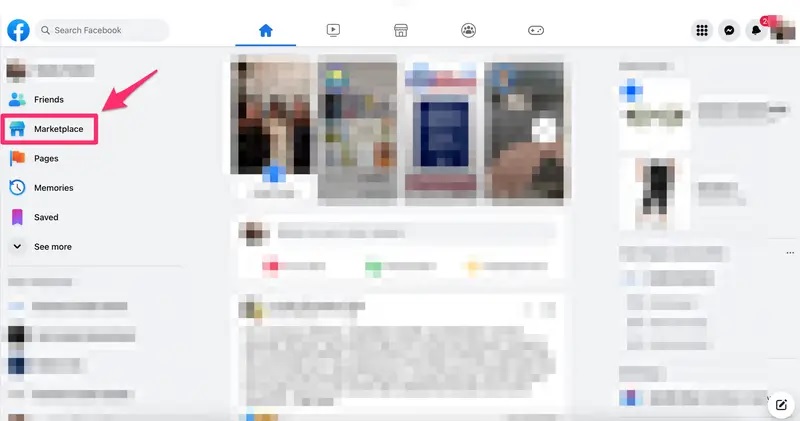
- Open your Facebook account and log in.
- On the left-hand sidebar, you’ll see a "Marketplace" icon. Click on it to enter the Facebook Marketplace.
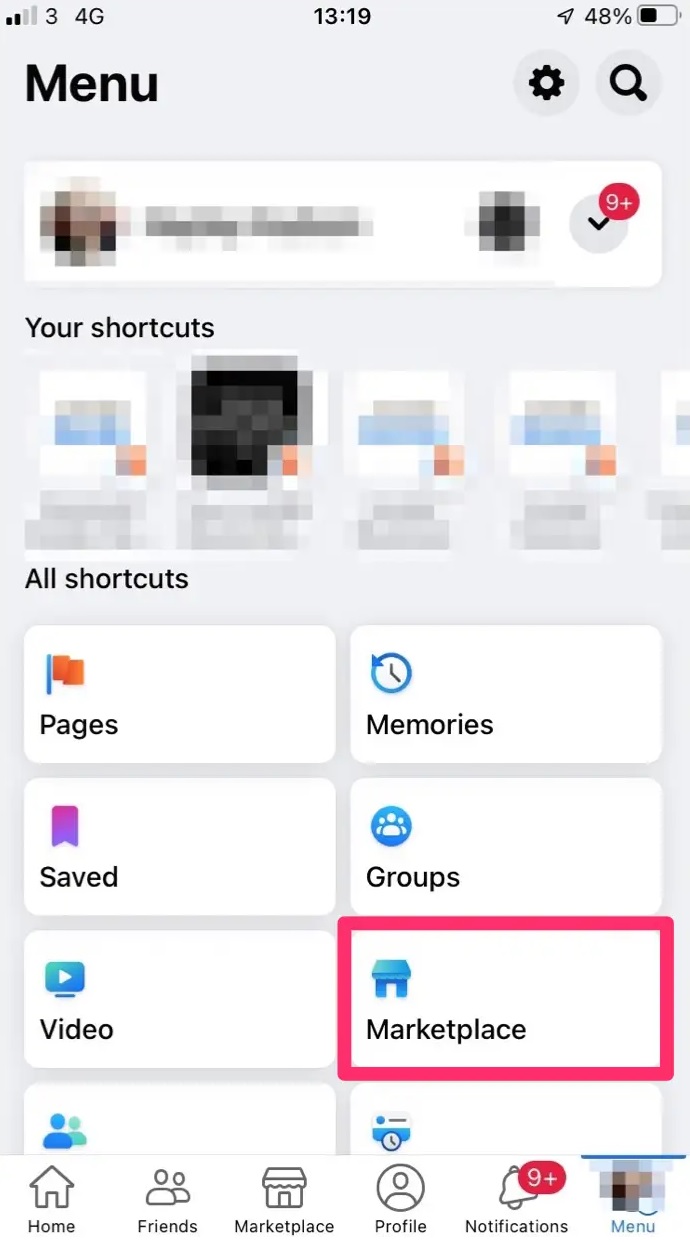
On Mobile App
- Open the Facebook app on your mobile device.
- Tap the menu icon (three horizontal lines) in the bottom right corner.
- Scroll down and select "Marketplace" from the list of options.
Once you're in the Marketplace, you can browse items for sale, but to post your own item, follow the steps outlined below.
Step-by-Step Guide to Posting on Facebook Marketplace
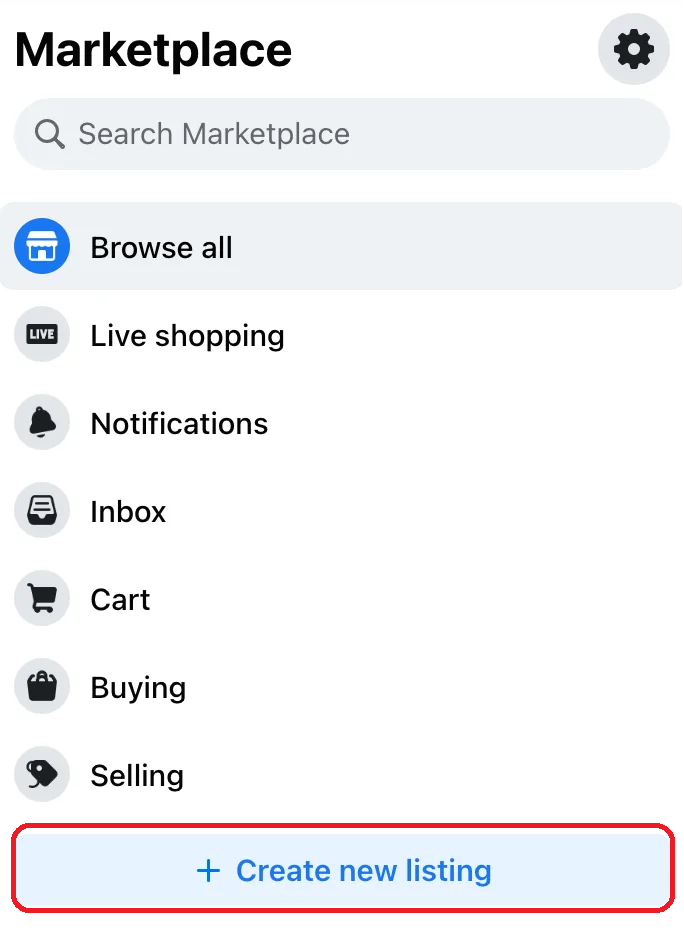
Step 1: Click on "Create New Listing"
Once you’re in Facebook Marketplace, look for the "Create New Listing" button. On desktop, this will appear on the left-hand side of the page, and on mobile, it can be found by tapping the "Sell" button at the top of the screen.
Mobile
Desktop
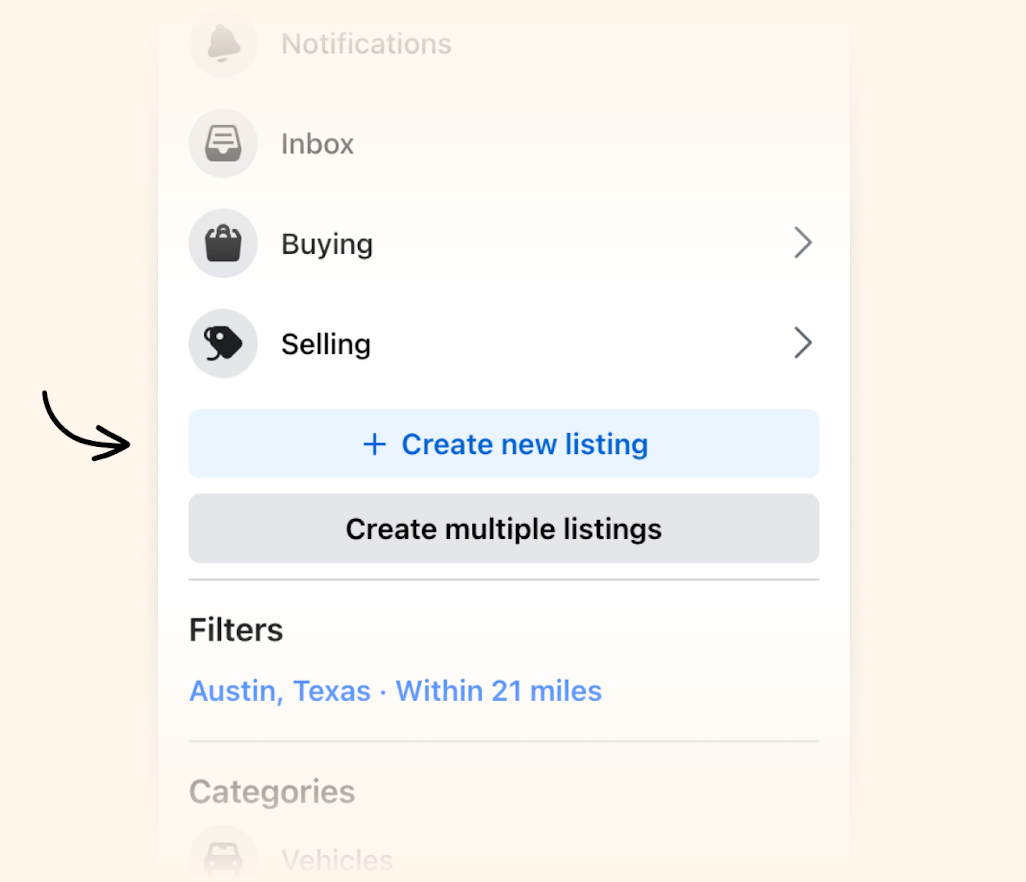
Click or tap on it to start creating your new listing.
Step 2: Choose a Listing Type
Facebook Marketplace gives you the option to choose what type of listing you want to create. There are four main options:
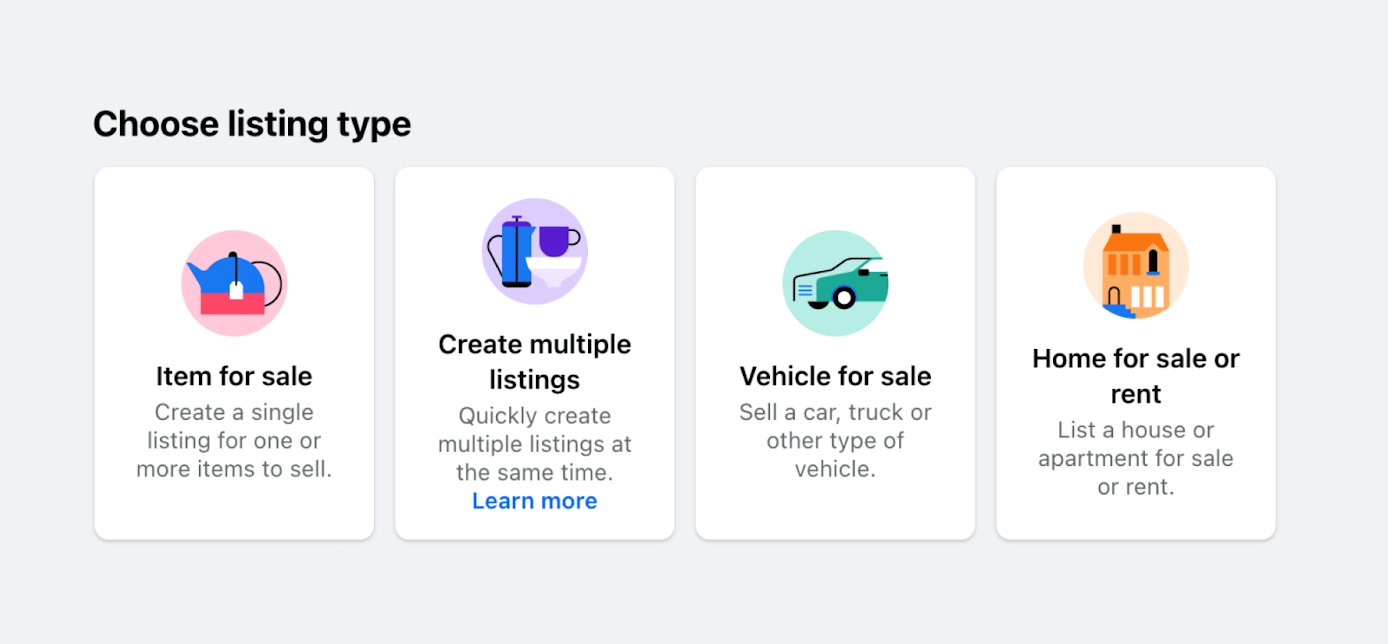
- Item for Sale: This is the most common type, where you list a physical item.
- Vehicle for Sale: If you're selling a car, motorcycle, or other vehicle, select this option. It allows you to include specific details like mileage and condition.
- Home for Sale or Rent: If you're looking to sell or rent a property, use this option. It provides fields for square footage, number of bedrooms, and other relevant details.
- Job Opening: Businesses can use this option to post job vacancies. This option allows for the inclusion of details like job type, salary, and required qualifications.
For this guide, we'll assume you're selling an item, so select "Item for Sale."
Step 3: Add Photos
After selecting "Item for Sale," you will be prompted to add photos of your item. High-quality images are critical to attracting potential buyers, as people will likely make snap judgments based on how your item looks. You can upload up to 10 photos, so use this space wisely by providing multiple angles, close-ups, and images that highlight important details or imperfections.

Tips for Great Photos:
- Ensure your photos are clear, well-lit, and focused.
- Use natural lighting or bright indoor light to make the item look its best.
- Take pictures from different angles (front, back, sides, and top).
- Highlight any unique features or flaws to build trust with buyers.
Step 4: Enter Item Details
This step is crucial as it provides buyers with all the information they need to decide whether they want to buy your item. Fill in the following fields:
- Title: Make sure your title is clear and descriptive. Include the brand, model, or type of item (e.g., "iPhone 12 - 64GB - Black" or "Wooden Dining Table Set"). The title should grab attention while accurately describing the product.
- Price: Set a fair and competitive price for your item. Research similar items on Marketplace or other platforms to get an idea of market value. You can list items for free by entering "0" in the price field, but if you're hoping to make money, use a realistic number.
- Category: Facebook will prompt you to choose a category for your item. This is important because it helps potential buyers find your listing when browsing. Categories range from electronics, furniture, clothing, and more. Pick the most accurate category to increase your visibility.
- Condition: Facebook allows you to choose the condition of the item from a dropdown menu (e.g., New, Like New, Used – Good, Used – Fair). Be honest about the condition, as buyers will expect the item to match the description.
- Description: This is your chance to provide more detailed information about the item. Include specifics such as:
- Dimensions or size.
- Age or date of purchase.
- Any wear and tear or defects.
- Features and benefits.
- Why you're selling the item (optional).
- A well-written, honest description helps build trust and can set your listing apart from others.
- Location: Facebook automatically assigns your location based on your account settings, but you can update this to a more specific area if needed. This helps local buyers find your item.
- Availability: You can select whether your item is a single product or if you have multiple items for sale. If you’re selling multiple of the same item, list the quantity.
Step 5: Choose Delivery Method
Decide how you want to handle delivery or pickup. You can choose from:
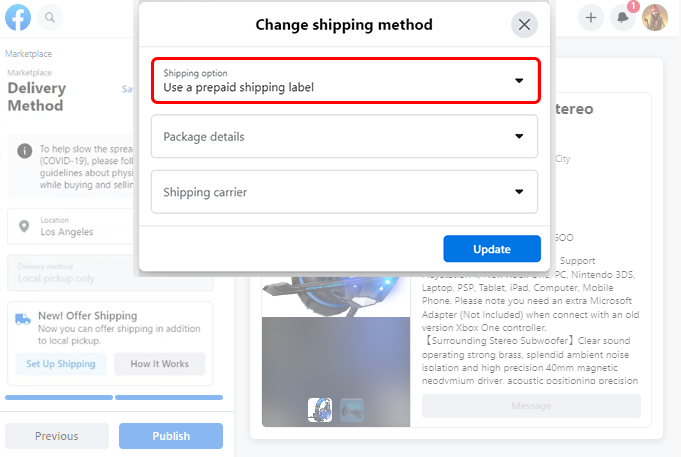
- Local Pickup: Arrange a time and place for the buyer to pick up the item.
- Shipping: If you’re open to shipping the item, you can indicate this. Facebook may prompt you to enter shipping details and costs, which will allow you to reach buyers beyond your local area.
- Both: Offer the option for both local pickup and shipping, giving buyers more flexibility.
Step 6: Publish Your Listing
After you've entered all the necessary details, double-check your listing to ensure everything is correct. Once you’re happy with the information, click the "Publish" button. Your listing will now be live on Facebook Marketplace, and interested buyers will be able to see and contact you.
Optimizing Your Listing for Success
Posting on Facebook Marketplace is easy, but to ensure your listing attracts attention and leads to a sale, you can optimize it in a few simple ways.
1. Use Keywords in the Title and Description
Think about what buyers might search for when looking for your item. Include relevant keywords in your title and description to make your listing easier to find. For example, if you're selling a smartphone, include details like "iPhone," "unlocked," "new," "space gray," and "64GB."
2. Respond Quickly to Messages
Once your listing is live, you may start receiving messages from interested buyers. Responding quickly shows that you’re serious about selling and improves your chances of closing a deal. Facebook Messenger will notify you of any inquiries, so keep an eye on your messages.
3. Update the Listing if Necessary
If your item isn’t selling as fast as you’d like, consider updating your listing. You can reduce the price, add more photos, or tweak the description to make it more appealing. Facebook may also show your item to more people if it sees that you’re actively engaging with the listing.
4. Share to Groups
In addition to listing your item on Facebook Marketplace, you can share your post to buy-and-sell groups in your area. This increases visibility and puts your item in front of more potential buyers.
Managing and Completing the Sale
Once you’ve found an interested buyer, arrange a meeting time and place that is safe and convenient for both parties. Many people meet in public areas like parking lots, cafes, or designated safe exchange zones (often found near police stations). After completing the transaction, mark the item as "Sold" on Facebook to remove it from Marketplace.
Conclusion
Posting on Facebook Marketplace is an efficient and user-friendly way to sell items locally or to a wider audience if you offer shipping. By following these steps and optimizing your listing, you can increase your chances of making quick and successful sales. With the vast reach of Facebook’s platform, Marketplace can be a powerful tool for both casual sellers and small businesses alike. Happy selling!


Guest